Wednesday, March 21, 2012

Paleo Meatloaf

I'm going to go ahead and say that this is my favorite paleo recipe. There are so many things I craved, especially when just getting started. It's not easy to stick to lean meat and veggies all the time. If you find yourself craving something hearty and filling - this is the ticket.

It's from CIVILIZED CAVEMAN. He's showing it below with an egg on top as breakfast. I made mine with his recipe for "Beasty BBQ Sauce", which was sooo good. If you wanted, you could make it dry with the sauce on the side and have it both ways!


Paleo Meatloaf

Servings: 8
Prep Time: 15 Minutes

Cook Time: 50 Minutes
Ingredients:
  • 2 Cups Almond Flour
  • 1 Lb Grass Fed Ground Beef
  • 1/3 Cup Coconut Milk
  • 2 Cloves of garlic, minced
  • 2 Carrots, minced
  • 1/2 Onion, minced
  • 1 Zucchini, minced (I hate zucchini so I left this out)
  • 1 Egg
  • 3-4 Tbsp Italian Seasoning
  • Salt and Pepper to taste
Process:
 
Note: I lazy-chopped all of my veggies in the mini-chopper for ease.
  1. Preheat your oven to 350 Degrees F
  2. Combine your almond flour and coconut milk in a bowl and mix well
  3. Heat a saute pan on medium heat and saute your onions, carrots, and zucchini stirring often until cooked.
  4. With about a minute left of sauteing add in your garlic
  5. Take your sauteed vegetables and combine them in the bowl with the almond flour and coconut milk
  6. Add in your grass fed ground beef, egg, italian seasoning, and salt and pepper and using your hands mix well
  7. Place your loaf in a greased loaf pan
  8. Bake in the oven for 50 minutes

"Beasty BBQ Sauce"

Servings: Makes 4 Cups
Prep Time: 15 Minutes

Cook Time: 60 Minutes
Ingredients:
  • 3 Tomatoes, Diced
  • 1 White Onion, Diced
  • 4 Cloves of garlic, Diced
  • 1 6 Ounce can of Tomato Paste
  • 1 Cup Beef Stock
  • 2 Tbsp Dijon Mustard
  • 2 Tbsp Apple Cider Vinegar
  • 1 Tbsp Extra Virgin Olive Oil
  • 2 Tbsp Sweet Paprika
  • 1 Tsp Sea Salt
  • 1 Tsp Cayenne
  • For sweetness add 1 Can of diced pineapple (I didn't do this and it was plenty sweet)
Process:
 
Note: I only simmered mine for 30 minutes and it was great.
  1. Combine all ingredients above in a sauce pan and place on stove over medium heat stirring frequently
  2. Once your sauce starts to boil, reduce heat to low, cover, and simmer for 60 minutes
  3. Once your sauce has simmered, turn off the heat and pour your sauce into a blender or food processor and run until you get a nice smooth sauce consistency

Links to these recipes are HERE and HERE. Enjoy!

Tuesday, March 20, 2012

Baked Salmon with...Brussels Sprouts!

This post isn't meant to be a genius concoction, but just an idea and an example of a quick weeknight meal in our house. Tonight was another missed day at the gym, so I wanted another dinner that would bake itself while I worked out in the garage. While this bakes, you have enough time to do 3 rounds of:

500m row (or 600m run)
30 squats
10 burpees 

Sounds easy, right? It's a quad KILLA. And - better than nothing.

For 2 servings, you'll need:

1 10 oz salmon fillet (skin off)
10 brussels sprouts
1 lemon 
crushed garlic
salt & pepper
olive oil


I preheated the oven to 375 and sprayed one large Pyrex baking dish with olive oil.

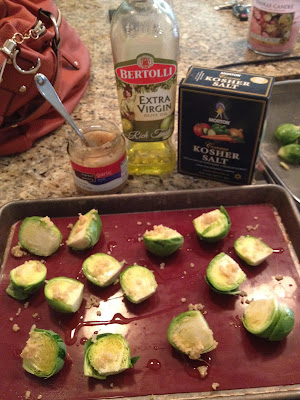
I halved about 10 brussels sprouts and drizzled in olive oil, kosher salt, and crushed garlic. These went in the oven for 10 minutes while I prepped the salmon.

In my opinion, the easiest way to deal with salmon is to order a salmon fillet from the fresh fish section of the g-store and have them cut the skin off for you. I can't stand dealing with scaly fish skin. I bought one 10 oz fillet for two of us, and sliced it in half when I got home. 

I squeezed lemon juice on each half, sprinkled with salt and pepper, and added a lemon slice on top of each. Then, I placed the salmon in the same baking dish as the brussels sprouts, which had a head-start.

375 for 20 (additional) minutes - and you're done! So fresh and delish.

Sidenote: my salmon fillet was about 1 inch thick. If you get a thinner piece, you'll want to check it after about 15 minutes to make sure your salmon isn't overcooking- aka getting soggy.

The best part about this is that we used ONE dish! You'll be happy to know we even used gluten-free paper plates.


What the heck? You mean to tell me the paper plates I've been using all this time aren't gluten free?! ;)

Wednesday, March 14, 2012

Apple Banana Cookies

I have a friend who can eat apples, but gets sick every time she eats baked apples. True story. Heyyy Corina! 

These were definitely good, but I think next time I'll cut out 2 of the eggs and add 1/2 a cup of raw honey for a little extra sweetness. The "batter" was sweet but the baked version - not as much.

The recipe is from CIVILIZED CAVEMAN. I use a ton of his recipes and they're all great. 

Apple Banana Cookies 

Ingredients:
  • 1 Cup Chopped Red Apples, skin on
  • 1 Banana
  • 1 Cup Raw Almonds
  • 1 Cup Macadamia Nuts
  • 1 Cup Shredded Coconut Unsweetened
  • 2 Tbsp Cinnamon
  • 2 Tsp Vanilla
  • 2 Tsp Coconut Oil (Melted)
  • 3 Eggs (I recommend cutting 2 of these out in lieu of 1/2 a cup of raw honey)
Process:
  1. Preheat your oven to 350 Degrees
  2. Place your almonds and macadamia nuts in your food processor and pulse until they are mixed together and in small chunks
  3. Place them in your mixing bowl
  4. Next add your apples and banana to your food processor and mix well
  5. Transfer that to your mixing bowl with your nuts
  6. Now add in your coconut, cinnamon, vanilla, coconut oil, and eggs and mix well using a hand mixer or if your feeling strong use some of that old fashion elbow grease
  7. Using a cookie scoop, form your cookie balls on your parchment paper lined cookie sheet
  8. Once your sheet is full, flatten your balls into cookie shapes
  9. Place in your preheated oven and bake for 15-20 minutes or until the bottom of your cookies are nice and lightly brown
  10. Enjoy

A few little technique notes:


If you don't have a mini-chopper I definitely recommend buying one. This one was about $10 at Walmart.  I use it all the time because I am far too lazy to actually chop things.


Basically you lazy chop everything and throw it into a bowl. Then blend with a hand mixer - or mix with a big spoon if you need a little arm workout. 


I made little piles on my silicon-lined baking sheet then flattened the piles with my spoon.

{Finished Product}

They are kind of like a snack bar, but packed with good fat and protein, and obviously no grain or added sugar is involved. They're a little carb-happy for me for post-lunch eating, but they will be great as a mid-morning snack. Clearly I'm ob-sessed with hyphens.

The link to the recipe is RIGHT HERE.
If you try these with the raw honey, let me know!

Xo,
Alyssa


Tuesday, March 13, 2012

Almond Butter Brownies

Ryan is hard to please when it comes to baked goods. If he doesn't love something, I can tell. He looooved these - that's how you know they're DELISH.


The recipe calls for an entire jar of almond butter, which makes these some 'SPENSIVE brownies, but so worth it. The butter vs. flour base keeps them moist for an entire week. It also makes them a little salty-sweet, which is my favorite kind of sweet. They're from Elena's Pantry. Elena is awesome. You can check out her blog here. 

{Almond Butter} Brownies


  • 1 (16 ounce) jar creamy roasted almond butter
  • 2 eggs
  • 1 ¼ cups agave nectar (If you think you'd like them a little sweeter, you may sub 1c raw honey)
  • 1 tablespoon vanilla extract
  • ½ cup cacao powder
  • ½ teaspoon celtic sea salt
  • 1 teaspoon baking soda
  • 1 cup dark chocolate chips (I used dairy & soy free Enjoy Life Chocolate Chunks)
  1. In a large bowl, blend almond butter until smooth with a hand blender
  2. Blend in eggs, then blend in agave and vanilla
  3. Blend in cacao, salt and baking soda, then fold in chocolate chips
  4. Grease a 9x13 inch Pyrex baking dish (I used coconut oil for this)
  5. Pour batter into dish
  6. Bake at 325° for 35-40 minutes
Makes about 24 brownies (Or if you're us, about 18 because we eat them brick-sized)


The link to this recipe is RIGHT HERE.

The grocery store dilemma.

One of the super fun parts about eating whole/non-processed foods is cost. I can do about as much damage in Whole Foods as I can at Neimans. The way I avoid sending us to the poor house is by meal planning. Sunday night (or Monday morning) I plan 3 to 4 weeknight meals and I go to Whole Foods at lunch on Monday. This way I'm able to avoid the Sunday night crowd and I don't buy more than I need - AKA no wasted $8.99 bunch of "live" basil.


Did you know that Whole Foods provides free (obviously nothing in WF is really free) little ice bags upon check out and will gladly ice down your groceries for you? I have gotten so used to grocery shopping at lunch and icing down my meat/cold goods that even if I'm at Kroger or HEB I buy a bag of ReddyIce and pour it into my insulated bag.


Which brings me to my insulated bag - which the checkout guy at Whole Foods told me was the "best he'd seen - and he sees them all the time." I got it for Christmas and it lives in my car along with piles of sweaty workout clothes and jewelry and shoes...okay you get it.


This one is made by "Picnic Time". 

I'm usually making this WF trip about 12:30 and my groceries stay cold in this thing until I get home after CrossFit at 7:00. So, the whole gym or g-store debacle is no longer a debacle. You can do both! Like I said I plan 3 - 4 weeknight meals in case we end up eating out. If I need another weeknight meal I'll either swing back by WF or it's breakfast for dinner, which the kids LOVE and think is so fun. Easy peasy. 

Xo,
Alyssa


Monday, March 12, 2012

Baked Chicken Breast with Roasted Brussels Sprouts

Obviously this is not rocket science - but it sure was G-O-O-D! I missed the gym today so decided to work out at home. As such, I wanted something that would bake itself while I busted out a half-Cindy in my garage (another story completely which ended in a huge hand rip).

I have a new favorite food - roasted brussels sprouts. I just cut the end off of these, cut them in half, and laid them out on a silicon-lined baking sheet. Then, I drizzled them with olive oil and sprinkled them with crushed garlic and kosher salt. I love the crushed garlic in the jar - makes everything faster.


Do you like my super glam award-winning iPhone photography?

I hammered these organic boneless, skinless chicken cutlets so they were all the same thickness and coated them in the exact same stuff - olive oil, crushed garlic, and kosher salt. Easy peasy.

Update: My chicken breasts were about 3/4 of an inch thick. If you pound them thinner, you'll want to reduce the baking time so they aren't too dry. 


375 degrees and 35 minutes to healthy, crunchy goodness. My main source of good fat here was olive oil. 


 So good I promise. So flavorful! I don't even miss cheese or blackberry cobbler right now. 

Xo,
Alyssa

Quick Steamed Eggs

Today is the first day of daylight savings time. As I drove to the office in the dark I was so confused about the lack of traffic - then it hit me. Spring Break! Oh yea.

Point being, I'm way early and I have just enough time to get this little post up for the early birds. So, we eat these eggs pretty much every weekday. Paleo doesn't leave too many choices for breakfast unless you want to get fancy with protein-packed baked goods, so we do these every morning and mix it up on the weekends.

I have had this little Black & Decker steamer since my freshman year in college. My grandmother - bless her heart - gave it to me for school so I could steam vegetables for myself every night. I think she would have driven to college station to beat me had she known I was actually eating Whataburger 4 times a week. Anyway...the steamer can be purchased for probably $30 at Walmart.


I also have these little baby Pyrex cups (the kind they use on food shows to add spices, etc). These are the perfect size for one egg. I spray these little babies with olive oil and crack an egg into each. I do whole eggs for Ryan and one whole egg, one white for me.


 My steamer holds 4 of these. They have several new versions of the steamer that are oblong and would probably hold more. I set the timer for 12 - 13 minutes and finish getting ready for the day. This makes them a little more like hard-boiled. If you like softer (poached) I'd set the timer for about 10 minutes.


On my way out, I pull out my little cups and leave Ryan's in the steamer. If you recover them quickly they'll stay warm in there for about an hour. I use a spoon to pop them out of the Pyrex like so.


 I've been using this salsa for a while and I LOVE IT. For the longest time I could only find it at Whole Foods, but they have it at HEB now. It's just avocado, cucumber, and peppers. Get some. YUM.


I eat this with 2 slices of turkey bacon - microwaved for 1 minute. And yes, this is a paper plate. Remember - PRACTICAL paleo.


I know that seems like a lot of instruction for something that literally takes 2 minutes (besides steam time), but I'm kind of new to this food blogging thing, so bear with me. ENJOY!

Xo,
Alyssa